Lower-back pain is figuratively, if not quite literally, a major pain in the backside. It doesn’t just cause discomfort…it can make it difficult to live an active, enjoyable, productive life. And it affects more than half a billion people each year, making it the single most common cause of disability, according to the World Health Organization.
An online search will turn up many potential stretches for lower-back pain—but which are best for your pain or for avoiding lower-back problems in the first place? Rather than search for the single best stretch, our Bottom Line expert Jonathan Su, DPT, says it is worth doing three, one for each of the three main movements that lower backs must make—forward bending…side leaning…and twisting.
If you are currently enduring lower back soreness or stiffness, perform each of the following stretches several times a day. When your back begins to feel better, you likely can reduce that to once a day or even every other day. Once the pain is well in the past—or if you’ve never had lower-back issues and you want to keep it that way—performing these exercises once or twice a week should be sufficient. But listen to what your back pain is telling you—if reducing the frequency of stretching leads to a rebound in lower-back pain or stiffness, increase the frequency.
Helpful: You might discover that one of the following stretches addresses your lower-back pain more effectively than the others. It’s fine to focus mainly on that exercise but try to perform the other two at least occasionally for the sake of overall lower-back fitness.
Supine Spinal Twist
Lay flat on your back on the floor or a mat with your feet and legs together and your arms pointing straight out from your shoulders, palms facing downward, so your body forms a “T.” With your legs together, lift your knees upward until your knees and hips both are at 90-degree angles. While maintaining the 90-degree angles of your knees and hips and keeping your legs together, slowly and gently drop your knees to the floor to your right side. Your upper body, including both shoulders, arms and palms, should remain flat on the floor during this movement—it’s accomplished by twisting the spine, not rolling to the side. Keep your legs and feet together. The right side of your right knee and leg should end up on the floor, your left knee and leg stacked on top of the right. You may feel a stretch not only in your back but also in your left hip or shoulder. Hold this position for approximately one minute…slowly return to the upper legs vertical and lower legs perpendicular to the floor. Repeat the stretch to your left side.
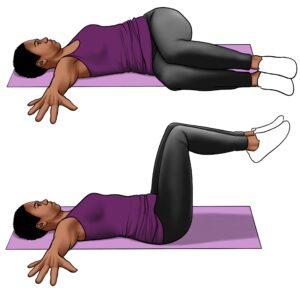
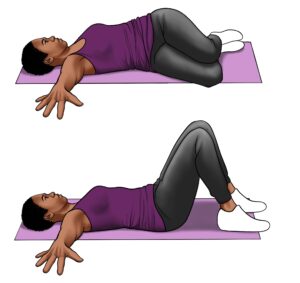
If you struggle with this exercise: If your back is too stiff for your knees and legs to twist all the way to the floor—and/or your muscles are too weak or sore to hold the positions described—use the following variation instead…
Start with your upper body and arms flat on the floor in a T position, palms down, as above. But instead of bringing your knees and hips into 90-degree angles, bend your knees so that the bottoms of your feet are flat on the floor and your knees point up toward the ceiling. Without altering the angles of your hips and knees, slowly and gently lower your knees to the right by twisting your spine—as above, your arms, shoulders and upper body should remain flat on the floor. Hold for one minute, then repeat to the left. If you can’t twist far enough to lower your knees all the way to the floor: Lower them as close to the floor as you can with only moderate discomfort and hold that position. The side of one foot remains on the floor in this variation, making it much easier to hold a not-all-the-way-to-the-floor leg position for a full minute. You likely will be able to lower your knees a little bit farther each time you try this stretch. Every now and then, attempt the feet-raised version of the stretch described above and switch to that when you discover that it’s achievable.
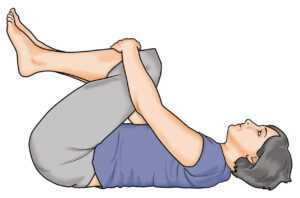
Knee-to-Chest Stretch
Lie flat on your back on the floor or a mat. Slowly lift your knees toward your chest. Wrap your arms around your legs and use your arms to gently draw your knees even closer to your chest and also to pull your knees together, if they’re not together already. Bring your knees as close to your chest as you can without causing more than slight discomfort. Hold that position for one minute…then slowly return your legs to an outstretched position. The knee-to-chest position provides a nice stretch for the lower back and hip muscles that we use to straighten back up from a forward bend. These muscles also help us maintain a standing position despite the downward pull of gravity.
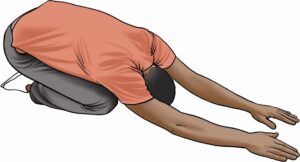
If you struggle with this exercise: If you experience anything greater than modest discomfort when you follow the steps described above—or lack the flexibility to draw your knees anywhere close to your chest—use the following variation…
Get on your hands and knees, with your hands positioned directly below your shoulders and your knees hip-width apart. Slowly move your buttocks backward toward your heels—your head and torso will shift back and also lower during this movement. Leave your hands in their original position throughout, so your arms end up extended in front of you—you can use your hands to help push your torso backward. In yoga, this is known as the “Child’s Pose.” Hold the stretch for one minute, then slowly return to the starting position.
Occasionally attempt the knee-to-chest stretch described above and switch to that when your back regains sufficient flexibility to perform it without substantial discomfort.
Crossed-Leg Standing Side Bend
While standing, cross your left leg behind your right leg so that your left and right feet are next to each other and facing forward, but on opposite sides than usual. Place your right hand on your waist and use it to push hips to your left as you extend your left arm up and over your head toward your right side. Your left biceps should be near or against your left ear, with your left hand and fingers more or less above your right shoulder. Hold this stretch for one minute and return to standing. Then reverse the position of your feet (cross your right leg behind your left leg) and repeat, stretching to your left. This is a great stretch for the quadratus lumborum, an often-overlooked muscle located alongside the spine in the lower back—it’s among the muscles that’s most often responsible for lower-back pain.
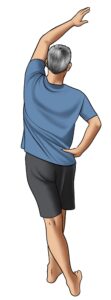
If you’re worried about maintaining your balance during this stretch: Standing with your feet crossed can create a potential fall risk. If you have any balance concerns, perform this exercise close to a wall or counter where you can use the hand that’s ideally placed on the waist and position it on this sturdy item for support instead.
