You heard it from your mother all the time—stand up straight. Mom was right! Proper posture doesn’t just make us appear more confident and commanding, it reduces the likelihood of chronic back pain, neck pain and other issues.
When someone has poor posture, his/her weight creates unnecessary strain on the spine, the joints and the body’s other supporting structures. Over time, more strain means more pain.
Back and neck pain are the most common consequences, but they’re far from the only ones. Poor posture also can cause pain that might seem completely unrelated to the way you sit or stand. Example: Extended sitting with your neck at an awkward angle can lead to chronic headaches. These headaches are becoming increasingly common as we spend ever-longer hours hunched over our phones, laptop computers and other electronic devices—yet many headache sufferers never realize that improving their posture could put a halt to their headaches.
Good news: Devoting 20 minutes a day to low-impact exercises often is all it takes to improve your posture and avoid or eliminate posture-related pain. The following simple exercises can strengthen back muscles and ease your pain.
Goal: Complete two or three sets of each exercise three to five days a week. These exercises don’t require equipment, but you can add wrist or ankle weights when you feel ready for a greater challenge.
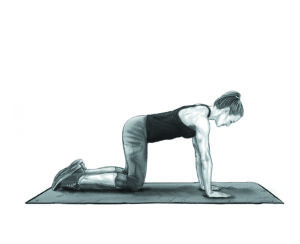
Exercise #1: Bird dog. This strengthens virtually all of the major muscles of the back, from the shoulders all the way down to the glutes (the buttock muscles).
To do it correctly: Position yourself on your hands and knees, with your hands directly under your shoulders…your knees directly under your hips and hip-width apart…your back and head parallel to the floor…and your eyes aimed straight down. Tighten your abdominal muscles, then slowly lift one arm straight out in front of you, thumb pointed up, while simultaneously lifting the opposite leg straight out behind you with your toes pointed down. Hold this pose, arm and leg both in line with your body, for three seconds, then slowly return to the starting position on all fours. Repeat with the opposite arm and leg. Doing this 15 to 20 times on each side constitutes one “set.”

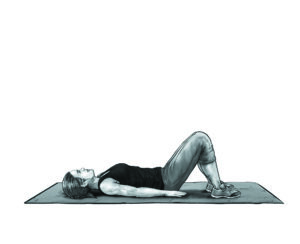
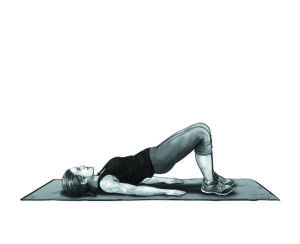
Exercise #2: Hip raise. Sometimes called the bridge, this is another exercise for the back muscles, including the glutes.
To do it correctly: Lie on your back with your knees bent, feet flat on the floor and hip-width apart and your arms alongside your body, hands flat on the floor with your palms facing down. Tighten your abdominal muscles, then raise your hips to create a straight line from your shoulders to your knees—your knees will be at an approximately 45-degree angle. Hold this pose for three seconds, then slowly return to the starting position. Do this 15 to 20 times per set.
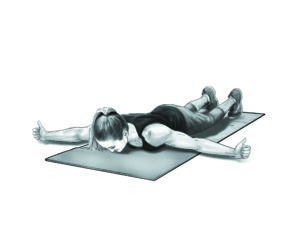
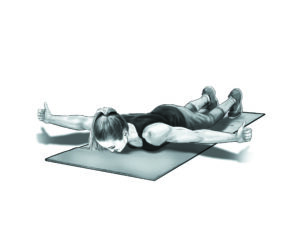
Exercise #3: Arm Lift. This targets the muscles of the middle and upper back.
To do it correctly: Lie on your stomach with your legs straight and arms perpendicular to your body—your body should form a “T.” Turn your hands so that your thumbs point toward the sky. Squeeze your shoulder blades together, and lower them down toward your feet. For comfort’s sake, lift your face slightly above the floor. Tighten your abdominal muscles, then lift your hands and arms three to six inches off the floor, all while keeping your elbows straight and thumbs pointed up. Hold this for three seconds then slowly lower your hands and arms back to the floor. Do this 15 to 20 times per set.
Exercise #4: Static leg lift. This exercise strengthens the muscles of the lower abdomen and neck.
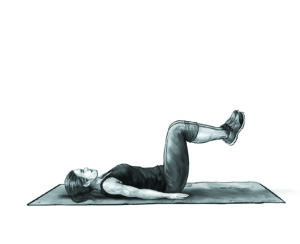
To do it correctly: The starting position is similar to the hip raise above—lie on your back with your knees bent, feet flat on the floor, and your arms alongside your body with palms flat on the floor. Tighten your abdominal muscles, and press your lower back into the floor—try to prevent your lower back from arching off the floor throughout this exercise. Raise your feet off the floor until your body is in the position it would be in if seated in a chair, only while lying on your back—your hips and knees should both be at 90-degree angles. Lift your head an inch or two off the floor. Hold this for 30 to 60 seconds, then bring your knees slowly toward your chest before returning to the starting position—knees bent, feet flat on the floor. Each time you do this is a set…perform a total of two to three sets.

Exercise #5: Wall chest stretch. This movement targets the muscles of the chest and the front of the shoulders—it’s especially valuable for people who tend to hunch when they sit or stand.
To do it correctly: Stand approximately an arm’s length from a wall with your shoulders perpendicular to that wall. Reach the arm that’s closer to that wall out and, with the elbow remaining straight, press your fingers and palm against the wall at shoulder height with the fingers pointing behind you. Relax your shoulder muscles, then slowly rotate your body away from the wall, until the hand that’s pressed against the wall is slightly behind you and you feel a good pull in your chest. Hold this stretch for 30 to 60 seconds, then reorient your body and repeat with the other arm. Each time is a set…perform a total of two to three sets.

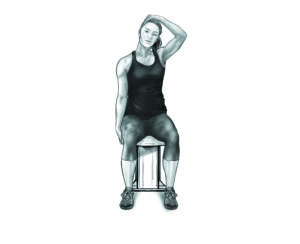
Exercise #6: Upper trap stretch. This stretches the upper trapezius muscles at the top of the shoulders.
To do it correctly: While seated in a kitchen or desk chair, reach down with one hand and hold or hook the underside of the seat on that side. Reach your other hand up over the top of your head, and, while facing forward, position it on your head above your opposite ear with your fingers pointed downward—your right hand would be positioned above your left ear, for example. Drop your shoulders, then gently pull your head to the side until you feel a good pull in the top of your shoulder—if your right hand is on your head, for example, this would gently pull your right ear toward your right shoulder and you would feel this pull in the top of your left shoulder. Hold this stretch for 30 to 60 seconds, then repeat on the other side. Each time is a set…perform a total of two to three sets.
