Carnivals and state fairs are among the great pleasures of summer and early autumn and, for those willing to brave them, those whirling, swirling, twirling rides can be a lot of fun. But even if hopping on those thrill machines isn’t your style, you can still enjoy them—by photographing them. Especially at night, carnival rides offer a brilliant combination of light, color and motion that photographers find irresistible. So, next time a carnival rolls into town, step right up and win yourself a few prize photos! Here’s how…

Equipment Basics
The truth is, any camera—even your smartphone can take great carnival shots. And while a tripod is key for certain shots, you can take great-but-different carnival photos without one (see below).
If you do have a more sophisticated camera, however—such as a compact zoom, mirrorless or DSLR—you’ll have the advantage of focal-length flexibility. Carnivals are an excellent place to flex that optical muscle. Zoom lenses—I carry two zooms with me, an 18-70mm and a 70-300mm—not only let you vary how much you include in the frame, but they open the door to a neat optical zooming trick that I’ll describe below. Also, these cameras typically have more built-in exposure options, including manual exposure, which helps with this zooming technique.
If you’re using a smartphone, you’ll get better shots if you learn to use the adjustable exposure settings built into most of them. You can also get apps designed specifically for low-light and motion-effects photography. If you’re an iPhone user, check out Slow Shutter Cam ($1.99 in the Apple App store) and for Android users, Long Exposure Camera 2, which is free in the Google Play store. One smartphone advantage: the LCD screen on a phone is much larger than a camera’s, so it’s very easy to compose and review wide-view photos.
Now, let’s get to the carnival…
Arrive Early, Stay Late
Carnivals range in size from small parking-lot events to extravagant, rambling shows at state or regional fairs—like my favorite, New England’s “Big E” annual summer-ending show. All carnivals can be a bit disorienting at first glance though, so it’s a good idea to arrive during daylight hours and do some scouting for the best places to shoot. Walk the carnival grounds in the afternoon to find good angles and safe shooting locations.

Twilight is a particularly pretty time to begin shooting. There is still a lot of blue light in the sky, and the lights on the rides usually pop on around sunset. Dusk is a good time to capture freeze-frames of the rides in motion because the lingering daylight allows faster shutter speeds.
Creative Exposures for Night Shots
Once the sky has gone completely dark, you’ll have even more exciting options. You can use longer time exposures in imaginative ways to capture images by combing light and motion. The specific exposures you set depend on the result that you’re after…
To freeze a ride in motion, remember that higher ISO speeds make the camera’s digital sensor more sensitive to light and so will enable you to use faster shutter speeds. Try an ISO of 800 or 1000 and check your results on your LCD. The actual shutter speed will depend on just how fast the ride is moving.

Experiment with long exposures, too, to capture a different effect—the abstract pattern of lights on a ride. Try this method: Place your camera on a tripod (see below), set your ISO to its lowest setting, and put the camera in the manual exposure mode. Next, set the lens to a very small aperture (f/16 to f/32) and then experiment using a broad range of long-time exposure times, ranging from around a half second to two seconds or longer. (I’ve made exposures as long as 10 seconds.)
Again, the actual shutter speed you use will depend on a variety of factors including the speed of the ride and its brightness (most rides use LED lighting, which is very bright and the colors are super-saturated) and the degree of blur or abstraction that you’re trying to create. Because you can see the effects immediately on the LCD, you’ll know when you’ve hit a good combination of aperture, shutter speed and ride motion. The concentric circles of a Ferris wheel, for example, create “targets” of colored light, as in this photo…

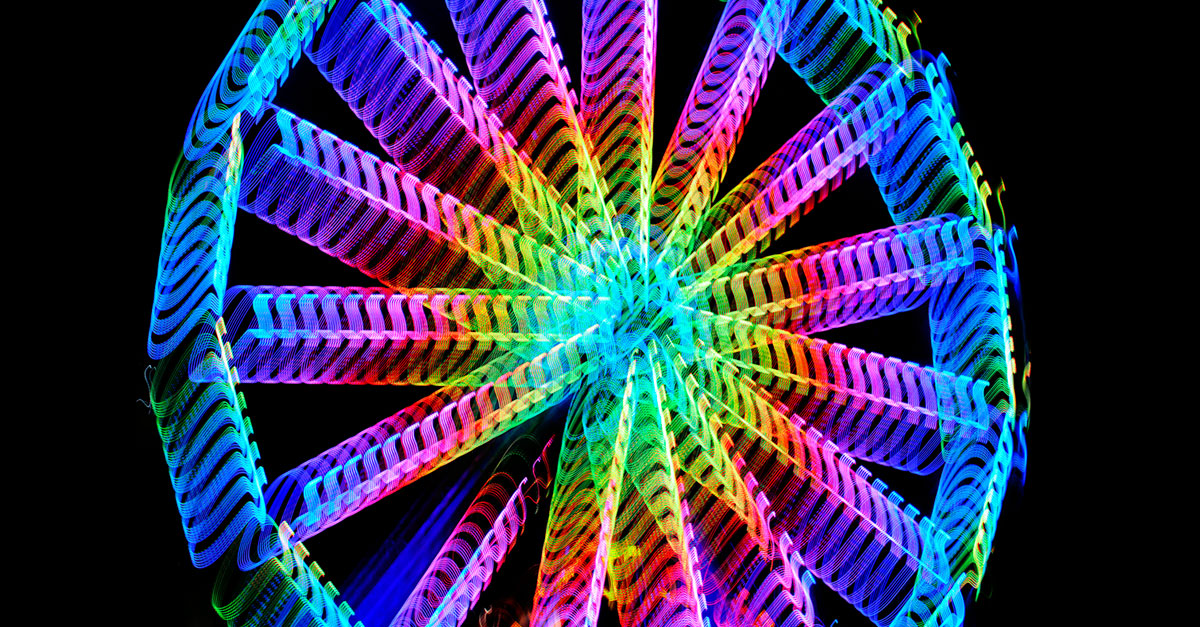
Exploit your zoom’s hidden talent. I told you I’d give you a fun zooming technique. It involves “racking” the zoom lens through its entire range of focal lengths during a time exposure. Using this method, you not only capture the motion of the ride, but because you are shifting focal lengths you’re also getting a wild optical blur. The results can be beautiful and they’re totally unpredictable. The shifting focal lengths create what I call ‘blades’ of light, as in the photo below.

Creating the effect is simple: Set the exposure time to a half second or longer and then, after you press the shutter release, twist the lens through from one end of the focal-length range to the other. It doesn’t matter if you start with the lens set at its longest focal length and then make it go wider or vice versa. It takes a little practice to get the timing and coordination right. Bring a few big memory cards with you, by the way, because this fun technique can be very addictive. Here’s another shot that takes advantage of this technique:

Find a good spot to place a tripod. Exposure times for creative night effects are typically several seconds or longer, so a tripod is essential to keep the non-moving parts of your scenes sharp. Carnivals being the crowded places that they are, however, you have to find a safe out-of-the-way spot to set up and tripods are not always allowed. Scout around for shooting locations on the fringes of the carnival that have good views. All of the Ferris wheel shots in this article, for example, were actually taken from a grassy strip in a parking lot.
No tripod? Shoot anyway and let the camera motion become a part of your shots—try intentionally jiggling the camera to create some added abstraction.
Consider the RAW mode. If your camera has a RAW mode and if you do your own editing, I recommend shooting in that mode because it gives you more control in adjusting the color balance after the fact.

Use colorful backdrops to shoot people. If you’re visiting a carnival with friends or family, the brightly lit food courts (see photo above) and rides make a very fun and colorful backdrop for informal portraits. My photographer friend Julie Sanch shot the photo below of her family using the ambient daylight to illuminate the faces and the rides as a backdrop:

Photograph courtesy of Julie Sanch, used by permission.
The toughest part about shooting good portraits is that there’s really no way to balance the cacophony of different lighting sources, so your subjects’ faces will almost certainly have an unusual color cast. Personally I think that helps capture the mood of carnivals. But if you find that the faces are consistently too dark, try turning on your built-in flash to add some light. Most cameras do a pretty fair job of balancing flash and ambient light.
Also, since dodging the crowds of people that are in perpetual motion around you is almost impossible, you’re better off going with the flow. If strangers photo bomb your shots, so be it, that’s the carnival experience.
Looking for more expert photography tips? See Jeff Wignall’s articles on how to shoot the moon, capture sunsets, photograph birds in your backyard and take great pet photos.
Unless otherwise noted, all photographs courtesy of Jeff Wignall, used by permission.